> For the complete documentation index, see [llms.txt](https://commanderhelp.verifone.com/llms.txt). Markdown versions of documentation pages are available by appending `.md` to page URLs; this page is available as [Markdown](https://commanderhelp.verifone.com/feature-references/features-and-products-references/pos-pairing/using-pos-pairing/pairing-after-the-initial-auto-upgrade-pairing-expired-or-revoked.md).
# Pairing after the initial Auto Upgrade, Pairing Expired or Revoked
{% hint style="warning" %}
It is strongly recommended by Verifone to perform the pairing process between each POS Workstation and the Commander on the same day the system is Auto Upgraded or whenever pairing has expired or has been revoked.
{% endhint %}
{% hint style="info" %}
See the Security section in the Commander User Reference for assigning the appropriate access level so that Pairing Service can be started.
{% endhint %}
If the POS displays the "Sec. Alert - Pairing Invalid" or the "Sec. Alert - Pairing Required" message, follow these steps to pair the Verifone POS Workstation with the Commander. The POS Workstation displays one of the two messages below at login to Sales or between each transaction in Sales.
 
{% stepper %}
{% step %}
Put the POS Workstation into pairing mode
On the POS Workstation, navigate to CSR Func > Maintenance Menu. Press \[Perform POS Pairing]. A message asking to perform POS pairing displays.


Press \[Yes]. A message "Rebooting to start the pairing process..." will briefly display. The POS will reboot and then the "Pair POS" screen displays. Proceed to the next step.


{% hint style="info" %}
Make sure that the POS Workstation displays "Pair POS" before proceeding to the next step.
{% endhint %}
{% endstep %}
{% step %}
Start the Pairing Service in Configuration Client
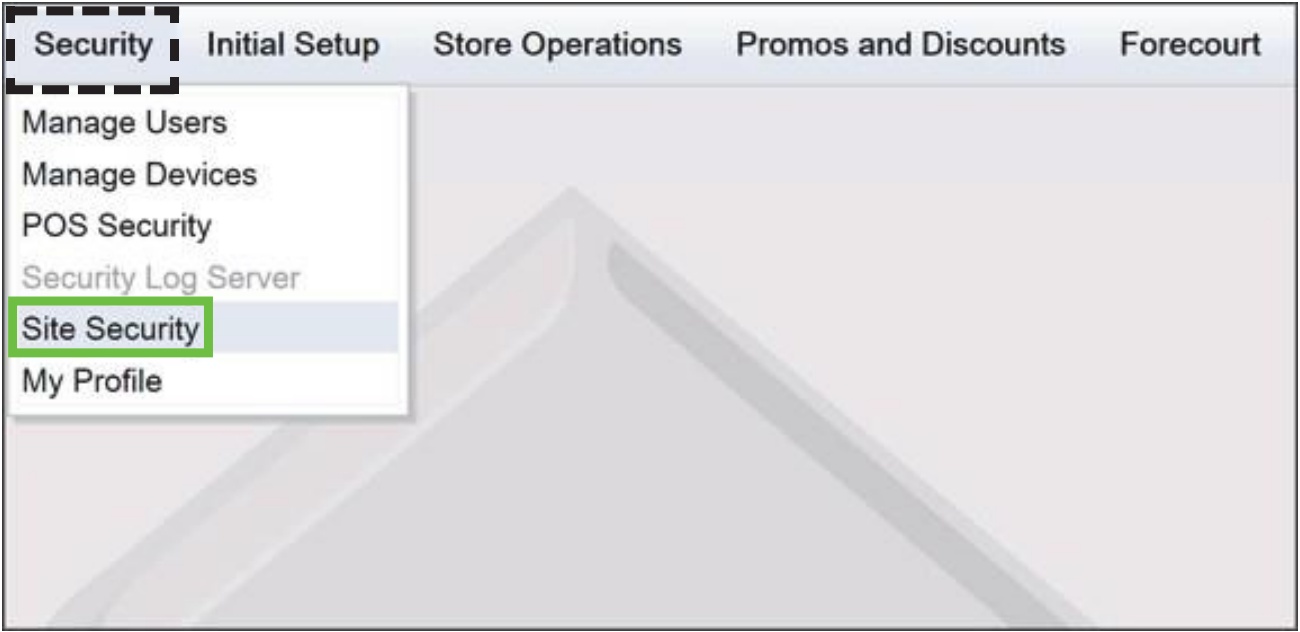
At Configuration Client and using the Manager credentials, navigate to Configuration Client > Security menu and then click on \[Site Security]. A One-Time Password dialog box displays.
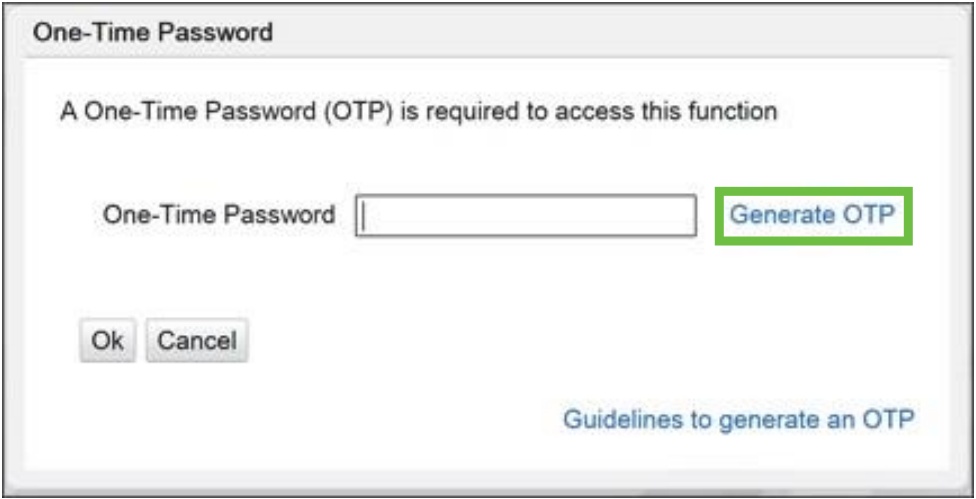
Press the \[Generate OTP] link. The "OTP has been generated. Please read it from the Commander Site Controller's status display." confirmation message displays.

Press \[Ok] to continue.
Read the OTP digits from the Commander, the two pairs of two-digits alternate on the 7-segment status display with the first pair having the decimal point.
Enter the four OTP digits into the text box and then press \[Ok].
Press \[Start Pairing Service]. A confirmation message stating "Pairing service is started" displays.
{% hint style="info" %}
After the Pairing Service has started, there is a limited amount of time to begin the pairing process at a POS workstation. Otherwise, the Pairing Service will have to be restarted.
{% endhint %}
Press \[Ok] to continue.
{% endstep %}
{% step %}
Begin pairing on the POS Workstation
Go back to the POS Workstation.
{% hint style="info" %}
If the "Unable to pair at this moment, please try again" message displays, it means that a different POS workstation is currently being paired with the Commander.
{% endhint %}

Press \[Pair POS]. A Pairing OTP dialog box displays on the POS.
{% hint style="info" %}
After pressing \[Pair POS] on the POS and if the text within the button changes to "Please wait..." and remains there for several seconds, check the cables and router between the POS workstation and the Commander.
{% endhint %}

{% hint style="info" %}
On the POS workstation, after \[Pair POS] is pressed, there are only a few minutes to key in the OTP and press "OK". However, the pairing OTP must be retrieved within one minute of pressing \[Pair POS] or it will no longer be available.
On the Pairing keypad, the letter 'B' is not used. The letter 'd' is lowercase in the Pairing keypad because it is displayed the same way in the twin 7-segment display on the front of the Commander or on the side of the RubyCi.
{% endhint %}
{% endstep %}
{% step %}
Retrieve the Pairing OTP from Configuration Client
Go back to the Configuration Client.
Press the \[Retrieve Pairing OTP] button. A "Pairing session OTP" dialog box displays.

Read the 6-digit Pairing session OTP code from the dialog box.
{% hint style="info" %}
Make a note of the OTP and then press \[Ok].
{% endhint %}
{% endstep %}
{% step %}
Enter the OTP on the POS Workstation
Go back to the POS workstation.

Enter the 6-digit Pairing session OTP code read from Configuration Client into the "Pairing" dialog box.
Verify that all digits and/or letters have been entered correctly.
{% hint style="info" %}
The "Ok" button on the Pairing keypad will not be active until 6-digits have been entered.
If the Pairing session OTP was entered incorrectly, a new pairing OTP must be retrieved.
If the message "Unable to pair, please try again" displays, press \[Pair POS] again within two minutes. Otherwise, the Pairing Service will need to be restarted.
{% endhint %}
{% endstep %}
{% step %}
Complete the pairing process
Press \[Ok]. The message "Processing, please wait..." displays and then after a moment, "Successfully Paired" displays.
{% hint style="info" %}
If the "Unable to pair at this moment, please try again" message displays, it means that a different POS workstation is currently being paired with the Commander.
{% endhint %}


Press \[OK] to continue. A message "Pairing completed, preparing to start POS application..." displays. The POS reboots and then starts the application.

{% endstep %}
{% step %}
Repeat as needed
Repeat these steps if:
* Pairing was not successful
* The site has more than one POS Workstation
{% hint style="info" %}
Each POS Workstation will remain paired for a maximum of one year. However, within two weeks of expiration, renewal occurs automatically. If the renewal were to fail, manual re-pairing by the retailer will be required.
Make sure to revoke all trust from the pairing relationship if the POS Workstation is removed from the system for any reason. See Revoke All Trust section.
{% endhint %}
This completes the Pairing after the initial Auto Upgrade, Pairing Expired or Revoked section.
{% endstep %}
{% endstepper %}
---
# Agent Instructions
This documentation is published with GitBook. GitBook is the documentation platform designed so that both humans and AI agents can read, navigate, and reason over technical content effectively. Learn more at gitbook.com.
## Querying This Documentation
If you need additional information that is not directly available in this page, you can query the documentation by asking a question.
Perform an HTTP GET request on the following URL with the `ask` and `goal` query parameters:
```
GET https://commanderhelp.verifone.com/feature-references/features-and-products-references/pos-pairing/using-pos-pairing/pairing-after-the-initial-auto-upgrade-pairing-expired-or-revoked.md?ask=&goal=
```
`ask` is the immediate question: it should be specific, self-contained, and written in natural language.
`goal` is what the user is ultimately trying to achieve, the reason they need the answer. Sharing it helps GitBook give you a better, more relevant answer. A goal is most helpful when it describes the outcome the user wants rather than restating the question. For example, with `ask=how do I create an API token`, a goal like `automate deployments from our CI pipeline` lets GitBook tailor the answer to that use case.
The response will contain a direct answer to the question and relevant excerpts and sources from the documentation.
Use this mechanism when the answer is not explicitly present in the current page, you need clarification or additional context, or you want to retrieve related documentation sections.


