> For the complete documentation index, see [llms.txt](https://commanderhelp.verifone.com/llms.txt). Markdown versions of documentation pages are available by appending `.md` to page URLs; this page is available as [Markdown](https://commanderhelp.verifone.com/feature-references/features-and-products-references/zebra-scanners/configuring-zebra-scanners/managed-modules-in-configuration-client.md).
# Managed Modules in Configuration Client
{% hint style="info" %}
Any USB port on the POS can be used to connect a USB Scanner device. After connecting a new scanner to the POS, restart the POS before configuring the scanner.
Recommendation is to have the scanner connected to the POS either during reboot or during an Auto-Upgrade process. If an existing scanner is being replaced or reconnected to the POS, the POS must be restarted. If a reconnected device was configured before, then no configuration steps described here are necessary. However, the system must be restarted.
Any combination of serial or USB scanner can be connected for primary and secondary scanner.
From Verifone Commander Release 56.01, a system restart is not required. All configured USB scanners will work as plug and play. Any future configuration changes requires a restart.
{% endhint %}
Scanner configuration and changes can only be made through **Configuration Client > Tools > Managed Modules**.
{% hint style="info" %}
From Verifone Commander Release 56.00, scanner configuration changes from POS > Cashier Functions > Maintenance > Device Control and POS > Cashier Function > Maintenance > Device Configuration are no longer supported.
{% endhint %}
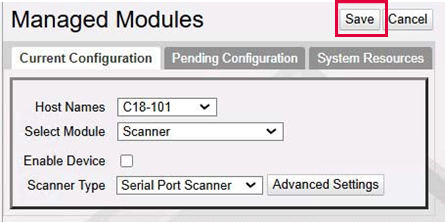
Go to **Configuration Client > Tools > Managed Modules**:
{% stepper %}
{% step %}
In Host Names, select the POS that the new/reconnected scanner is connected to.

{% endstep %}
{% step %}
In Select Module, select "Scanner" or "Secondary Scanner".

{% endstep %}
{% step %}
Deselect Enable Device.

{% endstep %}
{% step %}
Click Save.
{% endstep %}
{% step %}
In Scanner Type, select the type of scanner connected to the POS. Select Serial Port Scanner for RS-232 scanners or USB Scanner for USB scanners.
{% endstep %}
{% step %}
**Serial Port Scanner**
1. Select "Advanced Settings".
For Serial Port Scanner Advanced Settings, the following is displayed:

1. Use Port Name to select the communication port to which the device is connected.
2. Use "Enable 12V" if device needs to be powered by the POS.
3. For Scanner Capability, select whether it is a "2D Scanner" or "Ruby Ready Scanner".
* **“Ruby Ready” or 1D Only Scanner Devices**
* Baud Rate: 1200
* Databits: 8
* Stopbits: 1
* Parity: None
* Flowcontrol: The scanner waits for CTS to be asserted before transmitting data. If CTS is not asserted within 2 seconds, the scanner issues an error indication and discards the data. When the scanner sends the data, it asserts RTS during transmission.
* **2D Scanner Devices**
* Baud Rate: 9600
* Databits: 8
* Stopbits: 1
* Parity: None
* Flowcontrol: The scanner waits for CTS to be asserted before transmitting data. If CTS is not asserted within 2 seconds, the scanner issues an error indication and discards the data. When the scanner sends the data, it asserts RTS during transmission.
{% hint style="info" %}
From Verifone Commander Release 54, the default scanner parameters configured are the 2D scanner communications parameters. All serial cable scanner devices, including 1D scanners, may be configured with the 2D parameters. This will eliminate having to configure the Verifone application for the 1D Ruby Ready scanner. This will not affect existing devices used by customers that upgrade to the newer application versions as the configuration of the device is propagated to the newer version.
{% endhint %}
Click **Save** after making changes.
{% endstep %}
{% step %}
**USB Scanner**
For USB Scanner Advanced Settings, the following is displayed:

1. Use the "ScannerID/model" drop down to select which USB scanner to use.
2. Click Save after making changes.
{% endstep %}
{% step %}
After the above "**Advanced Settings**" are saved, the user is returned to the scanner module configuration display.
{% endstep %}
{% step %}
Select the "**Enable Device**" check box followed by the "**Save**" button.
{% endstep %}
{% endstepper %}
Configure other scanners using the same procedure.
{% hint style="info" %}
After all the scanner(s) have been configured and saved, the POS system must be restarted.
{% endhint %}
{% hint style="info" %}
From Verifone Commander Release 56.01, a system restart is not required. All configured USB scanners will work as plug and play. Any future configuration changes requires a restart.
{% endhint %}
---
# Agent Instructions
This documentation is published with GitBook. GitBook is the documentation platform designed so that both humans and AI agents can read, navigate, and reason over technical content effectively. Learn more at gitbook.com.
## Querying This Documentation
If you need additional information that is not directly available in this page, you can query the documentation by asking a question.
Perform an HTTP GET request on the following URL with the `ask` and `goal` query parameters:
```
GET https://commanderhelp.verifone.com/feature-references/features-and-products-references/zebra-scanners/configuring-zebra-scanners/managed-modules-in-configuration-client.md?ask=&goal=
```
`ask` is the immediate question: it should be specific, self-contained, and written in natural language.
`goal` is what the user is ultimately trying to achieve, the reason they need the answer. Sharing it helps GitBook give you a better, more relevant answer. A goal is most helpful when it describes the outcome the user wants rather than restating the question. For example, with `ask=how do I create an API token`, a goal like `automate deployments from our CI pipeline` lets GitBook tailor the answer to that use case.
The response will contain a direct answer to the question and relevant excerpts and sources from the documentation.
Use this mechanism when the answer is not explicitly present in the current page, you need clarification or additional context, or you want to retrieve related documentation sections.